
Guide10 min read
How to Set Up a Cellular Trail Camera: Complete Guide
Step-by-step guide to setting up a cellular trail camera. SIM activation, app setup, data plans, and placement tips for SPYPOINT, Tactacam, and Moultrie.
At a Glance
Getting a cellular trail camera live takes about 20–30 minutes with the right materials on hand. You need the camera, an activated SIM card or prepaid data plan, a compatible app on your phone, a fully charged battery set, and a mounting strap or hardware. Have all five ready before you drive to the property.
Choosing and Activating Your Data Plan
Cellular trail cameras use either a proprietary network managed by the brand (SPYPOINT's free-tier plan, Tactacam's Reveal subscription) or a standard nano-SIM you purchase separately. The distinction matters before you buy anything.
SPYPOINT cameras registered to a SPYPOINT account qualify for a free plan covering 100 photos per month on compatible models, according to SPYPOINT's official plan comparison page. Paid tiers run $8–$15/month depending on photo volume. Tactacam Reveal cameras use Tactacam's own data network; their subscription page lists plans from $5/month for 250 photos up to $13/month for unlimited. Moultrie Mobile cameras use AT&T's network and sell through Moultrie's own app ecosystem, with plans starting around $10/month per camera as published in Moultrie's activation FAQ.
If your camera accepts a third-party SIM, carriers like AT&T, Verizon, and T-Mobile all offer IoT or connected-device SIM cards. Hunters on the HuntTalk forums frequently report stronger Verizon coverage in the mountain West due to tower density differences, though you should verify current coverage maps for your specific county before committing.
A few practical activation steps apply to almost every brand:
- Download the brand's app (SPYPOINT, Tactacam Reveal, or Moultrie Mobile) and create a free account before you open the camera box.
- Register the camera's IMEI or serial number inside the app. This number is printed on the box and on a sticker inside the battery compartment.
- Select or purchase a data plan through the app's subscription flow.
- Insert the SIM card (if required) in the orientation shown on the battery-compartment diagram. Most cameras use a nano-SIM slot near the SD card slot.
- Power the camera on and wait for the network indicator LED to confirm a connection. SPYPOINT documentation states this handshake takes up to 2 minutes on first boot.
Verify data-plan roaming rules if you hunt across state lines. Some plans restrict photo delivery to home-network towers, which can delay transmissions by hours in roaming areas.
SIM Cards, SD Cards, and Battery Setup
These three hardware steps are the most common source of failed first deployments, based on patterns across hundreds of verified Amazon buyer reviews for SPYPOINT and Tactacam models.
SD card: Most cellular cameras still store a local copy of every image before transmitting. Use a Class 10 or U1-rated card; anything slower can create a write-speed bottleneck at burst intervals. A 32 GB card holds roughly 15,000–20,000 average-resolution JPEGs, which translates to many months of field storage for most setups. Our Trail Camera SD Card Guide covers formatting and brand compatibility in more detail.
Batteries: Cellular transmission is the single largest battery drain in any trail camera. Manufacturers publish the following estimated battery lives for standard AA alkaline cells: SPYPOINT FLEX G-36 documentation lists up to 6 months on 8 AA batteries in moderate-activity conditions. Tactacam Reveal X-Pro documentation lists up to 1 year on the same battery count, based on lower cellular ping frequency as stated in Tactacam's published specs. Lithium AA batteries (Energizer Ultimate or equivalent) extend those figures by 20–40% in cold weather, according to Energizer's published temperature-performance data. For a deeper breakdown of battery chemistry and cold-weather performance, see our guide on how long trail camera batteries last.
SIM card seating: Push the SIM card into its tray until it clicks. A partially seated SIM produces intermittent connectivity errors that are easy to misread as a network or coverage problem.
Placement and Camera Settings for Cellular Deployment
Cellular cameras introduce one variable that non-cellular cameras don't: photo transmission consumes battery on every trigger event. Your placement and settings should work together to reduce unnecessary triggers while keeping the camera active on meaningful animal movement.
Height and angle. State wildlife agency guidance, including published deer-hunting resources from the Texas Parks and Wildlife Department and the Pennsylvania Game Commission, consistently recommends mounting cameras 3–4 feet off the ground, angled 5–10 degrees downward, to keep the detection zone centered on a deer's body mass rather than its legs or the sky. A well-centered detection zone also reduces false triggers from sun-angle changes, which can generate dozens of blank cellular transmissions per day and drain your plan's monthly photo allotment quickly.
Detection range vs. trigger speed. The SPYPOINT FLEX G-36 publishes a 100-foot detection range and a 0.3-second trigger speed. At that range, set your detection zone sensitivity to medium unless you're monitoring a tight funnel of 20 feet or less, where high sensitivity may produce excessive multi-animal triggers.
Transmission delay. Most cellular cameras let you choose between immediate transmission and a scheduled upload window (such as every 6 hours). Immediate transmission works best for active scouting before a season opener. Scheduled transmission conserves battery and data during long-term off-season monitoring.
Quiet period / time-lapse mode. Many cameras include a configurable quiet period that suppresses triggers during midday hours when deer movement is low. SPYPOINT's app lets you set this window without touching the physical camera.
For trail intersections and food plot edges, our Best Trail Camera Placement Tips article covers approach angles and scent control in more detail.
Field Deployment: Step-by-Step
Step 1: Pre-program at home
Configure all settings at your desk before driving to the property. Photo burst count, video vs. photo mode, transmission schedule, and time/date stamp can all be handled through the app. Doing this at home costs zero field time and introduces no scent pressure at the site.
Step 2: Scout the mount location
Walk the site and identify the animal trail or focal point first. Then step back 15–25 feet to find a mounting tree with a clear lane to the target zone. Avoid trees with heavy canopy sway. Wind-driven branch movement is a leading cause of false triggers, cited across multiple Bowsite.com forum threads.
Step 3: Clear debris from the detection zone
Remove tall grass, brush, or hanging branches within the detection arc. A 5-minute clearing job can prevent hundreds of blank transmissions per month.
Step 4: Mount and level the camera
Attach the strap, check the horizontal level (most cameras have a bubble level or a digital level in the setup menu), then verify the vertical angle. Take a test photo in setup mode to confirm framing before closing the case.
Step 5: Activate and confirm signal
Power on and watch the network LED. Walk through the detection zone yourself. The camera should trigger and deliver a test photo to your app within 2–3 minutes on a connected network. If no photo arrives after 5 minutes, re-check SIM seating and move 10 feet closer to any visible tree-top clearing to improve sky view for the cellular antenna.
Step 6: Log the location
Record GPS coordinates in your app. SPYPOINT, Tactacam Reveal, and Moultrie Mobile all support map-pinned camera locations. Recovering a cellular camera mid-season in heavy snow with no logged coordinates is genuinely time-consuming. Take 30 seconds to pin it.
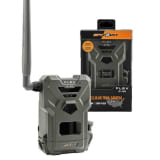
The SPYPOINT FLEX G-36: Where to Start
For anyone setting up a first cellular camera or expanding a small network, we recommend the SPYPOINT FLEX G-36 based on aggregated research across verified buyer reviews, SPYPOINT's specification sheets, and recurring positive mentions across HuntTalk and Bowsite hunting forums. At $99.99 MSRP, it pairs competitive specs with one of the lowest entry costs in the cellular category: 36 megapixels, a 0.3-second trigger speed, a 100-foot detection range, and 8 AA battery power.
SPYPOINT's free 100-photo monthly plan provides a functional no-cost tier while you learn the system. No competing brand currently matches that at this price point, according to published plan comparisons. The FLEX G-36 is a natural fit for high-traffic food plots and field edges, where 36MP resolution provides enough detail to distinguish individual animals at distance.
Sources
This guide draws on the following sources:
Recommended for this guide
If you need one, start here.
36MP photos, free data plan, and the best app in the category, the easiest way to get cellular scouting.
Jake
. Research Editor, BestTrailCamera.com